How to Paint a Needlepoint Canvas from a Chart
Needlepoint can very quickly become a very expensive hobby. Learning how to paint your own canvases from a chart can greatly reduce the cost you have to spend on each project.
Before you begin on your needlepoint painting journey, there are a few basic supplies that you’ll need. I will suggest my favorites for each category, but feel free to experiment to find what you like best. There are no true “rules” to needlepoint other than having fun!
Supplies
- Chart: this is the design “blueprint” you will follow to paint your canvas. You can shop my needlepoint charts on my etsy shop
- Paint: I like to use plain old acrylic paint, I typically buy this at my local craft store
- Paintbrushes: You will want some little tiny paintbrushes, usually called a spotter brush as well as a larger brush with an angled edge to fill in larger areas
- Canvas: I recommend using Zweigart Orange Line canvas, Pre-cut pieces of canvas can be purchased at Anna Dugas Designs that will fit any of the charts available to download from Anna Dugas Designs.
- Artists Tape: This is optional, but it is helpful to secure the edges of your canvas so they don’t fray and to keep your canvas in place while you paint. Canvas from Anna Dugas Designs will come with artists tape already applied to protect the canvas. Artist tape can also be purchased on Amazon.
- White Background: I like to tape a piece of paper to the surface I’m working on and secure my canvas on top of the paper. Paint is almost guaranteed to bleed through while your painting and the white background makes it easier to see what your working on
- Ruler: To measure your canvas and find your starting point
Step One - Aquire a Chart
There are a couple of different routes you can take to find a needlepoint chart, none of these options include copying or duplicating a design that you did not pay for.
My favorite route is purchasing a chart for digital download from Anna Dugas Designs! Some other routes are designing your own canvases using a chart software or graph paper, purchasing a chart from your Local Needlepoint Store, or purchasing a needlepoint book with printed charts (I’ve talked about needlepoint books on my TikTok).
I prefer to print out my chart so that the pattern can be as large as possible, another option is to view the chart on an ipad or computer screen if available. For this example we will use the included Heart chart. The Heart chart is designed for 13 mesh canvas.

Step Two - Prep the Canvas
Typically the mesh size and dimensions are listed on the chart. If the mesh size is not specified then simply pick your prefered mesh size to paint the design on. Keep in mind that the same design will be smaller on 18 mesh and larger on 13 mesh.
To determine the size for the piece of canvas you will paint on, you will first need to determine the size of the design you are painting. Count the squares of the grid to find the height and width of the design. For our heart example, the height is 21 squares and the width is 23 squares. If you are using 13 mesh, divide the number of squares by 13 to get the inches (21/13= 1.6 in. ). If you are using 18 mesh, divide the number of squares by 18 to ge the inches.
All Charts from Anna Dugas Designs will fit on an 8"x8" piece of 18 mesh canvas or a 12"x12" piece of 13 mesh canvas.
Typically the margins between the design and the edge of the canvas should be at least 2 in. Add 4. to the height and width of your design and then round up to the nearest even number since stretcher bars are sold as even number lengths. For our example the dimensions of the design are H=1.6 x W=1.7. If we add 4 in to both of those and round up we can find that we should use a piece of 13 mesh canvas that is at least 6in. x 6in.
Step Three - Find your Center
Before you start painting, tape down a piece of white paper or cardstock to the surface you will paint on and then secure your canvas to the white paper using artists tape.
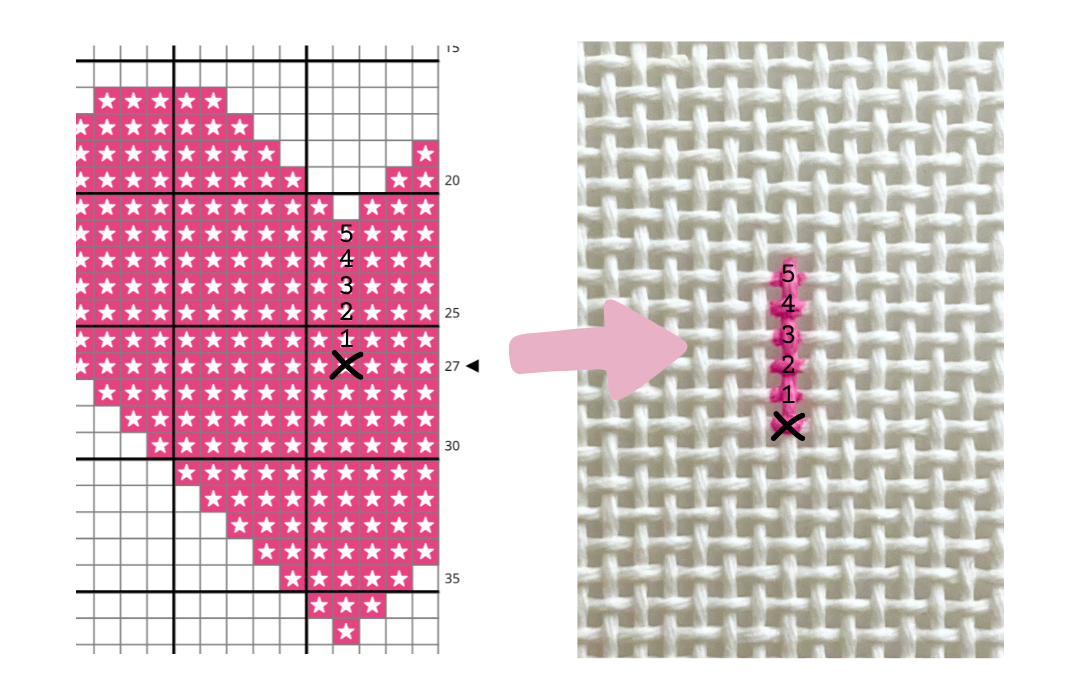
To start painting, locate the center of the design on your chart, this is typically marked by an X and arrows on the ruler sides of the chart.
Step Four - Begin Painting
Use your ruler to measure the top length of your canvas, mark the center fiber with a small dot of paint. Then measure perpendicular to the top along the middle fiber and mark the center of the design. The center is marked with an X on the example below.
Starting from the center point, count off the column straight up from the center to the edge of the design

Step Five - Outline the Design
For a simple design, I will count off the outline of the design from the chart. This allows me to go back and fill in that space without needing to count off every single intersection. For a more complicated design it might make sense to paint the color that takes up the most area first, then go back in with accent colors. Once you have completed a couple of canvas painting projects you will learn what you prefered method is.
For the heart design, after counting off the vertical line from the center, we will count the outline of the design all the way around the heart. The heart design is split between two pages, to continue the design from one page to the next, line up the ruler markings on the side of the charts.

Step Six - Fill in & Finish!
Fill in the design that you just outlined, this can be done by painting down each fiber with your small brush, or by using a bigger brush that can cover multiple intersections in one swipe.

A common problem I run into when filling in an area is having the paint flood over a hole. When this happens I will take a dry paint brush and poke through the hole to free the paint. If the paint dries with the hole flooded, use a pin or needle to poke through the paint.
Don’t worry if you mess up, remember you’ll be stitching over your painting so it doesn’t need to be perfect. The number one goal is to have fun and create art!
When you are finished painting, set aside your canvas for a few hours so that it can dry completely. To protect your canvas, you can fold artists tape over the edges of your canvas to prevent fraying. If you purchased your canvas from Anna Dugas Designs then it will come with the artists tape around the edges.
Happy Painting and Happy Stitching!